Most fund managers have a primary trading venue they want to minimize latency to. This question came up often during my time helping clients set up their cryptocurrency trading systems.
To solve this, I used a simple data-driven approach: a script that provisions, tests connectivity, and repeats until you find a region with the best latency. Sure, you could rely on someone else’s advice on the internet, but why not verify it yourself? With this script, testing is quick & simple.
In this post, I’ll walk you through how I tackled this problem.
The Approach

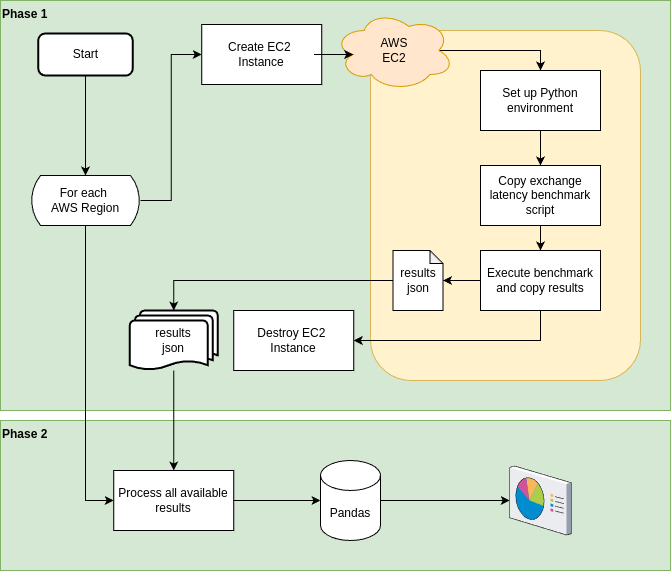
The process is divided into two key phases: Data Collection and Aggregation & Visualization.
Phase 1: Data Collection
This phase involves gathering latency data from different regions by automating the setup and execution of tests. The steps are:
-
Data Gathering (Repeated for Each Region):
- Provision a cloud instance in the target region.
- Set up the required environment (Python and necessary libraries).
- Copy the test script and environment variables to the server.
- Execute the test script and write the results to a file.
- Copy the test results back to the local machine.
-
Key Tools & Methods:
- Terraform: Infrastructure-as-Code to easily create and tear down cloud infrastructure as needed.
- CCXT Library: A standardized interface for interacting with nearly any cryptocurrency exchange.
- Latency Measurements:
- Public Latency: Measure by fetching the BTC/USDT ticker every second, 10 times. Note that this method may serve cached values, so the first values are always much higher.
- Private Latency: Measure by fetching wallet balances every second, 10 times.
Phase 2: Aggregation & Visualization
Once the data is collected, we can analyze and present it:
- Load the latency data into a Pandas DataFrame for easy manipulation and analysis.
- Create visualizations to compare and interpret the results across regions.
Since the dataset is relatively small, this phase is quick.
How to run this yourself
The code can be found in the Github repo here. Be aware that running this will incur AWS costs.
Requirements:
- Python 3.12, but it should work with earlier versions too.
- Terraform CLI
- Available here
- Once downloaded, place the terraform executable in the root of this project's github repo
- AWS API Key
- With sufficient permissions to create EC2 instances in all the needed regions.
- Cryptocurrency Exchange API Keys
- Make sure these are read-only, and do not have any whitelisted IP restrictions in place. It will also work with full permissioned API keys.
- SSH Key
- A Keypair is needed for all regions - this allows you to SSH into the newly created EC2 instances.
- The simplest way to do this, is to create a local RSA SSH key using
ssh-keygen, then uploading it to each required region.
set +o history
export AWS_ACCESS_KEY=XXXXXXX
export AWS_SECRET_KEY=XXXXXXX
set -o history

for r in us-east-1 us-west-2 ap-southeast-1 ap-northeast-1 eu-west-1 eu-north-1 eu-central-1; do ec2-import-keypair --region $r latency-test-key --public-key-file ~/dev/exchange_latency_explorer/temp_id_rsa.pub ; done
Create your config.yaml
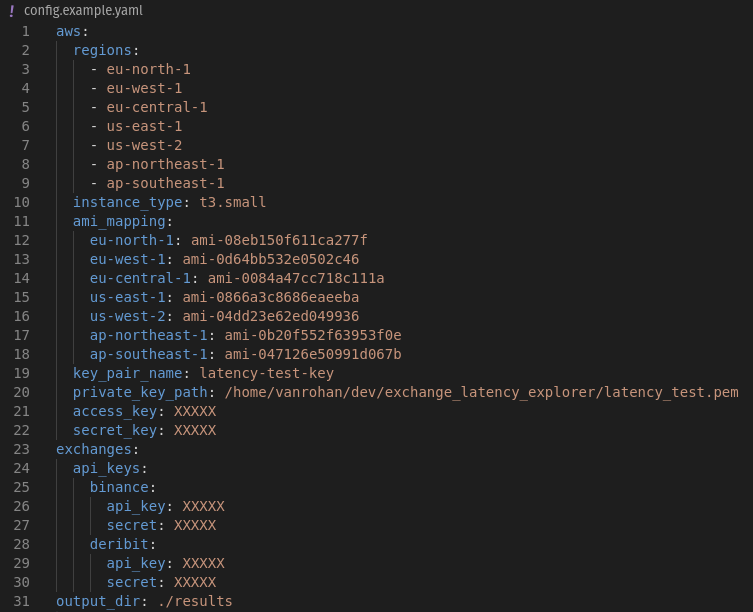
This is a centralized configuration for the the script. Here you'll specify which exchanges should be tested, and in which regions. You also provide the needed exchange API keys, AWS API keys as well as the name and path to the SSH key to use to access the EC2 instances.
Create a config file from the example template provided.
cp config.example.yaml config.yaml
Once you've configured your config.yaml file, it should look similar to this:

Execute the script
python main.py
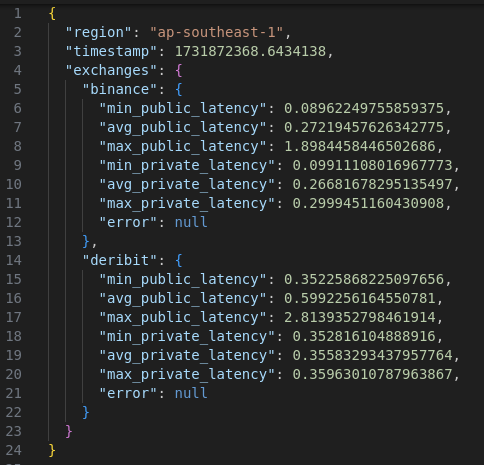
This will create a results file for each region, results_<region>_<timestamp>.json, here is an example of a the results file I got for ap-southeast-1:

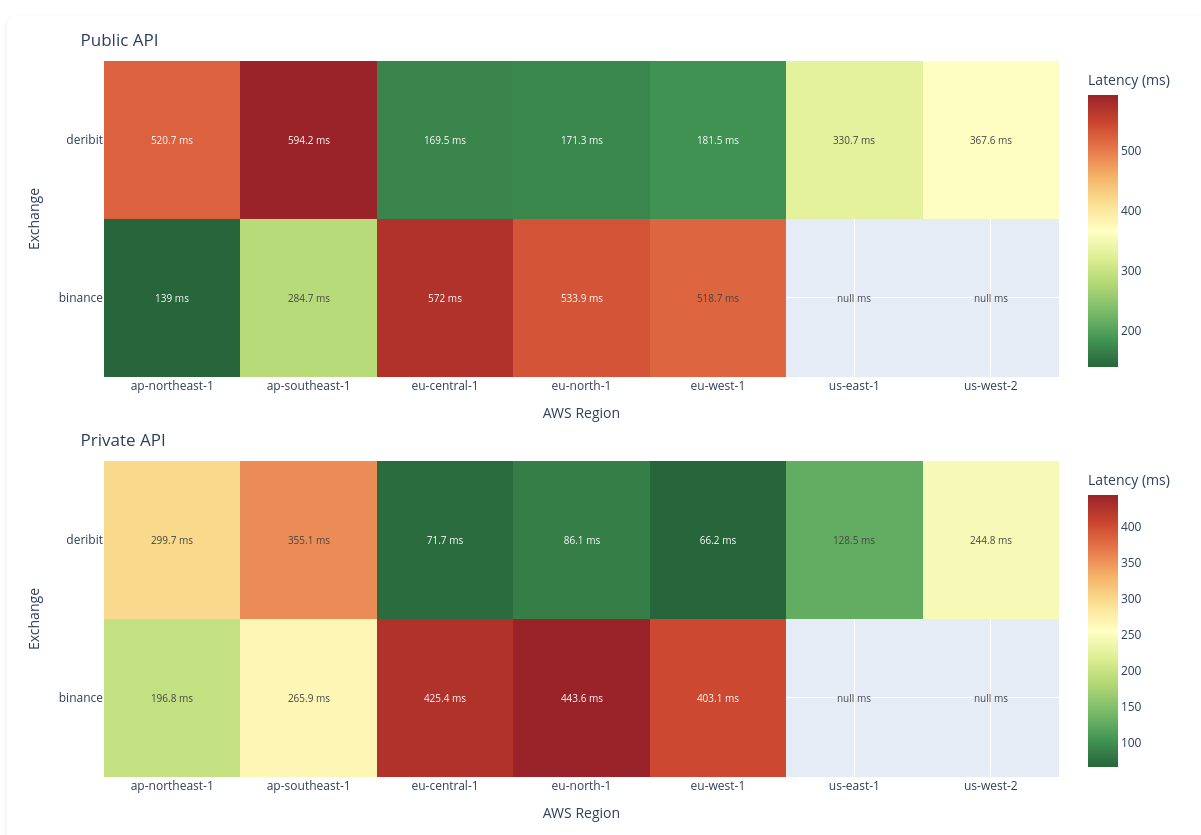
Once all the region results are collected, phase 2 will process these files and produce a report.html file in the /results folder.
As a safety measure, double check on your AWS EC2 Global View dashboard, that no exchange-testing EC2 instances are still running. They should all now be in Terminated status. I've ran this script many times without issues, Terraform always correctly tears down the instances it created.
View Results

This setup makes it easy to spot Binance has the best connectivity in ap-northeast-1, while Deribit performs best in eu-west-1 (at least in the regions we tested). On top of that, the data shows that Deribit’s private endpoint latency is generally much lower compared to Binance.
While some exchanges publicly disclose the location of their matching engines, this information isn’t always available. Even when it is, achieving optimal latency can be trickier than expected given variations within the same region. E.g. the exact rack location of your server can make a measurable difference.
Customization and Enhancement Ideas
Here are a few ways you could take this setup further and tailor it to your needs:
-
Track AWS Availability Zones (AZs): Once you've located the best performing Region, you can optimize further by finding the best Availability Zone (AZ). AZ labels are not consistent between AWS accounts, so you cannot follow online advice here. You should test performance for different AZz using your own account, to determine which AZ within the Region offers the best performance. Credit to Russell Groves for this AWS insight!
-
Real Order Testing for Private Endpoints: For more accurate private endpoint latency testing, place real orders (using minimum sizes) far away from the market. This requires funded accounts across exchanges but provides a realistic view of order placement latency. Do not do this without understanding the risks!
-
Explore Order Placement Techniques: Experiment with higher performance order placement methods if supported by the exchange:
- Financial Information eXchange (FIX®) Protocol
- WebSocket APIs
-
Extend to Other Cloud Providers: Add support for Google Cloud Platform (GCP) or Microsoft Azure to the script. This can help if you're unsure which infrastructure provider an exhange is using. Since Terraform already supports these providers, this enhancement should be straightforward.
-
Use a Specific Market: Test a market relevant to your use case instead of the default BTC/USDT.
-
Schedule Weekly Runs and Track Trends: Automate the process to run daily/weekly, collecting time-series data over time. Maybe host it as a dashboard?
I hope you found this useful! Please feel free to reach out on X or LinkedIn if you want to discuss any ideas or opportunities for collaboration.
Keywords:
#exchange #latency #analysis #terraform #AWS